
W&W Nursery and Landscaping is a Binghamton New York garden center and nursery specializing in gardening supplies, landscaping, lawn care, lightscaping, and live roof systems.
Showing posts with label DIY. Show all posts
Showing posts with label DIY. Show all posts
Tuesday, August 16, 2016
Monday, January 25, 2016
DIY: Decorating Plant Containers

Decorating plant containers.
It is a lot of fun to decorate clay pots with your kids. Begin with a clean, smooth pot and then add imagination. You can paint the outside of the pot with acrylic paint. If you want to achieve a “color wash” look, you can either thin the paint (craft stores carry products for this purpose) or apply the paint and then gently wipe some of it with a paper towel while it’s still wet. Another option is to glue and seal some photos, magazine clippings, or paper drawings to your container. This can be done with Mod Podge—a glue, sealer, and finish all in one. It comes in different finishes including a “sparkle” version to add some glitz to your craft. Use one coat to glue-on the material and another to seal over the surface. For more information, click here for a more extensive article on Decorating Clay Pots.
SOURCE: http://www.kidsgardening.org/node/13761
Saturday, December 19, 2015
Great Gifts for Gardeners of All Ages
For the Adult Gardener in Your Life
WW Manufacturing Square Spade - Bar nun the greatest spade on the planet. You can do anything with it!
 A new pair of gloves. We at W&W would expect last year's gloves to be worn out and pockmarked with rips and holes.

A pond kit. Water features have become a staple in American gardens. What better way to help local wildlife (and your soul) than to put in a pond or waterfall.

A pair of Felco pruners. Felco is the pinnacle pruner. We use it everyday at W&W. No other brand can match its durability. Seriously, It will be the last pruner you buy.


A nice arrangement of pots to accent and enhance the garden.
For the Young Gardener in Your Life

A pair of muck boots, so the kids can play in the garden this spring and not get covered in mud.

A small wheelbarrow. A little help goes a looooong way with a child's imagination. Give them memories of working hard in the garden, and hopefully create memories that will be there for a lifetime.
Kid's shovel. The essential tool for any gardener, no matter how old they are.
 Give them the opportunity to make their own little garden. Give them a space that allows them to create and get dirty.

A packet of seeds, so they can see the magic of nature growing before their eyes.
Tuesday, December 8, 2015
Poinsettia Care - Shopping Tips
Here are some items to consider while making your poinsettia selection:

Avoid plants with foliage that is beginning to yellow. The actual flowers of the poinsettia are the golden yellow clusters (cyathia) in the center of the colored bracts. The colored bracts are actually the plant’s leaves that change color to attract pollinators. When you choose your poinsettia, make sure the plant you choose still has the bright golden yellow clusters in the center.


 |
| Seen at the 4th Best Christmas light display in the country. |
A protective sleeve should be placed on the plant to shelter it from cold temperatures on its way from the store to home. The poinsettia should be taken home and unwrapped as soon as possible. Leaving the plant in an unheated car while you continue to shop will cause cold injury.
Sunday, November 22, 2015
DIY Thanksgiving Table Decorations

If you're thinking about how to decorate your table for Thanksgiving, look no further than your own backyard. Decorating your table with natural elements will give your table the perfect rustic look you've seen in the magazines.
 Have your kids help you by collecting as many pine cones and acorns as they can find and fill a bowl or a tall glass vase.
 On the day of your celebration, look for freshly fallen leaves that still have their beautiful color. For the finishing touch, add a couple tea light candles to illuminate your beautiful centerpieces.
Thursday, November 12, 2015
Planting Hardy Bulbs in Containers for Indoor Blooms

Cover the bulbs with more potting mix to with- in 1/4” of the pot lip. The tips of the bulbs should be visible. Water the bulbs and move the container to a cool area such as a shed or unheated garage, or the refrigerator. The bulbs require 13 weeks at 35–48 degrees Fahrenheit. Water as needed. In a few months, you’ll begin to see signs of growth. At this point, bring the container indoors and water regularly. Place in bright light until flowers show color (3–4 weeks). Once color is visible, move to bright indirect light. Soon you’ll be rewarded with beautiful blooms.
If you’re preparing a container of flowering bulbs to place on your deck or patio, keep the container in a garage or a basement where the temperature stays around 35–40 degrees Fahrenheit. A cold frame can also be used. If kept outside, the bulbs will be subjected to a damaging freeze/thaw cycle. In March you can safely place your container of bulbs in their outdoor location and enjoy the emerging spring color.
Monday, November 2, 2015
November Garden Tasks

Vegetable Garden
- Clean out old plants and compost including Asparagus beds as the fronds fade. Harvest Jerusalem artichokes, broccoli, radishes, peas, parsnips, lettuce, leeks, potatoes, kale, collards, celery, cauliflower, cabbage and Brussels sprouts.
- Prepare beds for early plantings of peas this allows for an earlier planting in the spring before the soil dries out enough to be worked.
- Plant Fava beans (cover crops can double as a source of beans for the table), garlic, onions, rhubarb and artichokes.
- Prune the fruiting top sections of evergreen raspberries once they finish producing fruit and leave the lower section of branch for next years early crop. Other raspberries can be topped off at 5 feet and staked.
- Store your bounty by freezing canning or hanging in a cool garage.

Flower Garden
- Plant pansies outdoors now and enjoy the flowers until late spring. Mound soil or leaves around the base of hybrid teas and other grafted roses to protect the graft union from frost.
- Prune rampant suckers from the base of lilacs which will take away from next years bloom.
- Prepare and plant wildflower bed and broadcast seeds. This can be done in the spring as well but you can get a head start now and focus on other tasks come spring.
General Landscaping
- Prepare open beds in the flower and vegetable garden with organic matter and organic fertilizers. Chopped leaves, peat moss or compost can be added now to improve the soil’s humus levels. This improves the structure, drainage and nutrient holding capacity of your soil. For established beds work in organic matter and fertilizers around the plants and cultivate them into the to few inches of soil.
- Mow lawn to 1.5 to 2 inches for the winter This keeps the lawn healthy and prevents the lawn from matting down.
- Keep leaves and compost or make a dedicated leaf mold pile for future mulch unless they are from allelopathic trees (producing chemicals that inhibit other species growth) like the genera Juglans (e.g. Black Walnut or Aesculus (e.g. Horse Chestnut).
- Drain and clean man made pools and ponds. Remove tropical plants and store hardy lilies.
- Very last call for planting trees and shrubs including woody fruiting plants.

Thursday, October 29, 2015
Prevent Moss From Growing On Your Roof!
What is Moss?
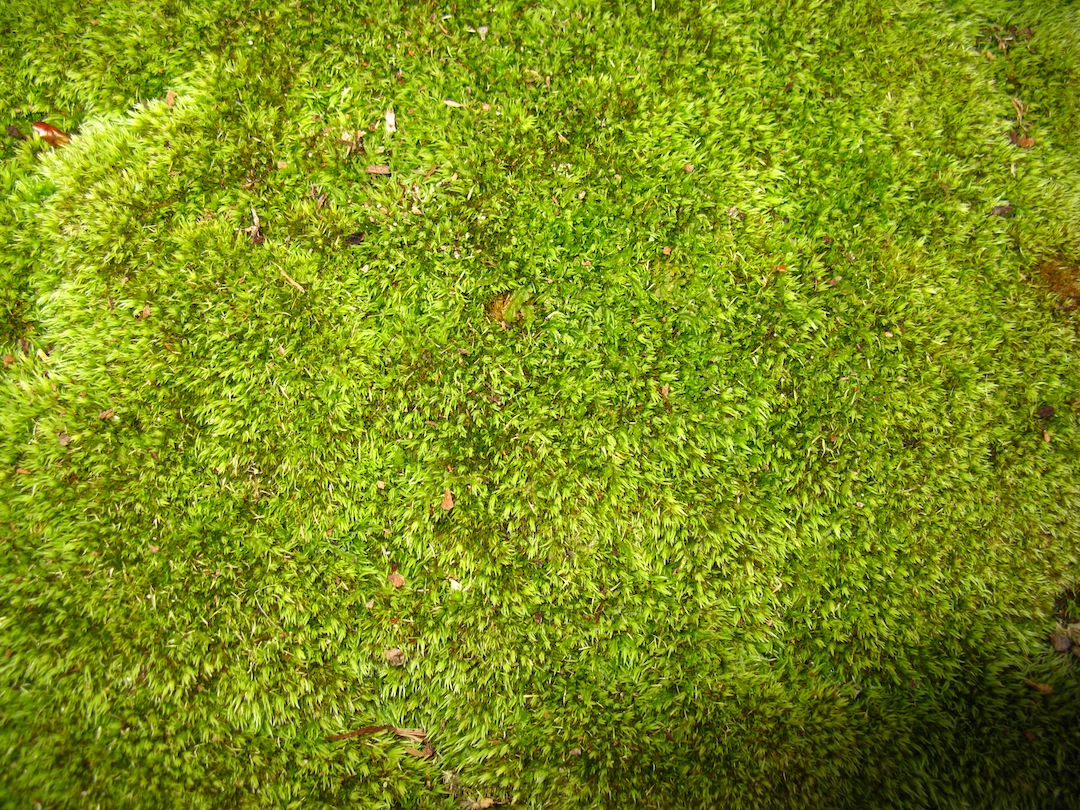 Moss is a plant species that grows really well in moist cool areas. There are many different species of moss. Some common characteristics among these species are that moss does not have flowers or seeds, they must have a damp environment to grow in because they do not have any root system to secure water, and they are usually extremely green with tiny leafs.
Why is Moss on The Roof Bad?
As the moss thickens and grows on an asphalt shingle roof it can raise the shingles up (much like a jack under a car). When the shingles get risen it allows water to go under the shingles causing the decking to rot and causing the roof to leak. The raised shingles also pose problems when heavy winds are present because they will catch the wind like a sail and this can cause shingles to be torn/blown off the roof.

A moss buildup on the roof causes more debris to get trapped on the roof. This debris promotes water buildup which makes the roof at risk of much more rotting and leaking.
Moss can actually damage the asphalt shingle components leaving it to break down faster.
This method of moss prevention and removal is highly effective but remember that it may be ineffective if the weather is often overcast and cloudy.
Moss can actually damage the asphalt shingle components leaving it to break down faster.
How to Prevent Moss
Remove the Shade
Because moss grows well in shaded areas one way to control moss/remove it from roofs or other areas is to remove its shade. This can be done by removing trees, trimming tree branches to allow more sun to penetrate, or remove bushes and other type of plant life that may be blocking the sun.This method of moss prevention and removal is highly effective but remember that it may be ineffective if the weather is often overcast and cloudy.
How NOT to Get Rid of Moss
Roofs are an investment that must be safe guarded. That being said, we want to give you some “what not to do” tips when trying to remove moss off of your roof.1. Do not pressure wash the moss off
By using a pressure washer to remove the moss you are going to dramatically reduce the life of your roof. How? The high powered water will remove the asphalt shingle granules which help protect the shingles and ensure a longer life span.2. Be careful with using acids to remove moss.
If your acidic mixture is too strong or stays on the roof too long, it can eat away at the shingles. If your roof cleaning solution has not been tested previously, make sure you test it on some spare shingles before applying it to your roof.
3. Do not scrape the moss off of the roof.
This can rip, crack, and break the asphalt shingles themselves.
4. If any water is used to remove the moss, do not spray the water at an upward angle.
If you do, this can cause water to go under the shingles and leak into the house or rot the wood decking of the roof.
Source: http://roofpedia.com/removing-moss-on-roofs/
Source: http://roofpedia.com/removing-moss-on-roofs/
Monday, October 26, 2015
Top 5 Must Do's Before Winter
With a little preventative maintenance in the fall your lawn and property will be in great shape in the spring. Here is a list of things you can do to make your life easier when things begin to get green again.
- The biggest chore in late autumn is getting the lawn ready for the winter season. You should mow your lawn right up to the time it quits growing in the late fall. The grass should be cut to a level of two inches at last cutting. A good sign it has quit growing is the absence of lawn clippings when you run the mower. If it is higher than two inches, winter winds and wet weather will flatten the grass, bending it over and causing it to retain moisture, which can lead to bacterial growth and mold, damaging the roots. If the grass is too short, the lawn will suffer from drying winter winds, and can be damaged by the sun. Always remove any leaves and debris from the lawn. Leaves left lying on your lawn all winter long can prevent water from reaching the grass, or will trap too much moisture. This causes the grass to rot and die before spring.
- Now is the time to fertilize the lawn. Look for fertilizers high in nitrogen. You may also consider a fertilizer that is lower in nitrogen, but higher in phosphorus and potassium. By fertilizing in late fall, you will encourage lush growth in the spring.
- Clean up the lawn mower. Wash and dry it, removing caked on dirt, lawn clippings, and grease. Remove any caked on grass from the mower deck, and inspect the blade for damage. Determine if it should be sharpened or replaced before spring. Putting you mower up on blocks during winter months is a good idea, also. It prevents flat spots from wearing in the rubber.

- Be careful in pruning trees late in the year. Many ornamental trees such as azalea, dogwood, forsythia, redbud and rhododendron set their buds for blooms in the late fall, and pruning them can destroy next season's blooms. Do remove any obviously dead branches.
- Thoroughly drain all water hoses, coil them, and store in a dry area. if using a hose reel, insure that all water is drained from the hose to prevent freezing and cracking during cold weather. Drain all faucets and valves, and turn off the water supply to them from the basement if you can. Turn over empty outside containers to prevent water collection and freezing, and store all birdbaths for the winter.


Source: http://www.doityourself.com/stry/toptenthingstodo#b
Saturday, October 24, 2015
Winterizing Trees & Shrubs

Trees with smooth bark will benefit from tree wrap. Starting at the base of the tree, wrap the trunk to the lowest branch, overlapping each layer by 1/3. Secure at the top with duct tape or twine. Remove the tree wrap by the end of April.
Broadleaf evergreens, such as Holly and Rhododendron, can be sprayed with Wilt Pruf to prevent dissecation. Apply late in the season while temperatures are still above 40 degrees Fahrenheit. You can reapply mid-winter if there is a brief warm spell. Wilt Pruf can also by sprayed on any plant, with or without leaves, that is in a very windy location. Use with caution on plants with very fine needles (Hemlock, Arborvitae, Juniper); follow the product’s instructions on the label.
Plants sensitive to wind or sunburn can also be wrapped with burlap. Wrap in late fall and secure with twine or staples. Burlap can also be used to protect plants from deer and rabbits.
A-frame shrub protectors can be placed over plants that are under the drip line of your roof to protect them from snow or ice damage. They will also provide some protection from wind and sun.
Spray-on deer and rabbit repellants can be applied mid- to late fall. Follow the product’s instructions on the label for effective coverage.
A small group of shrubs require special winter care: Buddleia (Butterfly Bush), Caryopteris, Vitex (Chaste Tree), Scotch Broom, Big Leaf Hydrangeas (pink or blue flowering varieties). After the leaves have fallen from these plants, apply 12–18” at this time. Caryopteris, Scotch Broom and Hydrangeas can be cut back to green growth in the spring. The mulch should be removed in spring as the temperature warms.
The following plants are slow to start growing in the spring, so a little patience is required: Butterfly Bush, Caryopteris, Chaste Tree, Ornamental Grasses, Hardy Hibiscus.
Monday, August 24, 2015
Press & Sun Bulletin - Nursery Owner Looks to keep Business Diverse

Ken Williams began mowing lawns as a teenager. Now, he owns a 57-acre nursery and landscaping business in Apalachin, with plants, produce, design services and landscaping crews.
In a recent interview, Williams, owner of W&W Nursery & Landscaping, discussed the challenges of running a small business, the art of gardening and why he’s proud to own “the place along the highway.”
QUESTION: How did W&W Nursery & Landscaping start?
ANSWER: I started mowing lawns at 13 just to make money. If I could push the mower to it, I could mow it. My first summer out of college, I bid a job for Hadco Corporation. They gave me a shot by hiring me and I turned around and invested back into the business. I just kept working. I had worked for another nursery for five years learning the trade.
I had done the landscaping for the previous owner of this farm. One day, I decided to plant a seed. I said, “If you ever want to sell, let me know.” The ground here is river-rich soil. It’s perfect for growing and it has a highway exposure. He accepted, and I moved from my old location on Gaskill Road (in Owego) to this facility in 2002 and opened to the public in 2005.
We’re family here. My nephew, Jeremy, is my operations manager. My wife works with the books. My son works part-time, he’s a nursery hand and does networking. My daughter is here full-time helping on the maintenance side. I never thought I’d see the day I had both of my kids on a job site with me.
We currently have 57 acres, 38 in production. We have 16 employees regularly; at our peak, we have 20. W&W Nursery and Landscaping is a full service nursery and garden center. We have hard goods, plants, mulches, tree shrubs, and we deliver. What sets us apart from the box stores is education and experience. This is all we do, and we grow it. Our product is acclimated; our trees are growing in the ground. That makes a big difference if it’s grown in the Southern Tier. We’re not always force-feeding consumers like the box stores. We grow a variety of trees, not just a few to pick from. We know our business and we can compete. Not to mention, our quality is better at W&W.
Q: How has your business evolved?
A: It all started with landscaping and maintenance. We didn’t like what was coming in from suppliers so we decided to start our own nursery because we wanted to control our own quality. I always knew I wanted to have my own nursery where I could grow my own to make me more competitive for larger projects. Also, I wanted to supply the do-it-yourself market because there’s a demand for good quality. That’s how it evolved.
We’ve had to diversify and be smart. We have to be innovative in order to keep things fresh. It’s not just setting plants out on the gravel or blacktop anymore. We have design & build and we’ve established a u-pick produce area. We grow trees, shrubs, annuals, perennials, vegetables and fruit trees, and we have our crews out doing work. It all fits together. After all, gardening is a lifestyle.
Q: What are some of the challenges of doing business here?
A: I started my company in 1988 with just ambition, mowing lawns. I built it. I had some gifts from God along the way, and I knew how to run with it, so I feel I’ve paid my dues. The cost of doing business and the challenges in New York State have so far exceeded when we started. As we’re coming into our 28th year, I’m thankful to be established. If I were a new business, just starting, I wouldn’t do it in this state. Between taxes, utilities, and regulations, costs are getting out of hand. We feel we’re working twice as hard for the same outcome.
In order to overcome some of our challenges, we capitalize on selling to retail and wholesale customers. We’re supplying up the East Coast: municipalities, golf courses, universities, garden centers, and even landscapers. In fact, we have over 300 landscapers on our mailing list. That’s really what’s starting to grow for us.
Q: Do you think the proposed minimum wage hike for employees of the fast-food industry will have an impact on business?
A: Absolutely and for us to a point. People that work for us enjoy this trade. I feel business will either close, move or create self-checkout to eliminate people, which will in turn create more sterile environments. So I ask — is this the state doing this to fix our broken welfare system? The people that work part-time and get assistance now will be at a higher income so they lose assistance? Time will tell.
We’re facing a lot of challenges like all businesses. We’ve diversified. It’s important to count your blessings and keep moving forward.
Q: What steps have you taken to help your business overcome those challenges?
A: I started with a video series in 2010 (Street Smart Gardener TM). It’s one of those ideas that just snowballed. We did it because we wanted the do-it-yourself individuals to feel comfortable about gardening. I’m trying to get younger generations to come in and garden too. We want to show that they can grow a vegetable garden just like anybody else, and we’re here to help. We had to adapt and diversify to bring those people in.
Five years ago is when I decided to start pushing gardening as a lifestyle. We want people to get back outside with nature a little bit so they can slow down and appreciate things more.
We’re willing to invest in ourselves and for our customers to make things easier. We have a full-time social media employee for Facebook, YouTube, Pinterest, Instagram, and our blogs. Social Media is fun because it enables us to more easily connect with customers. We’re also launching our new website sometime in the next few weeks, which will be mobile-friendly and make it easier for our customers to keep up with us.
We also offer virtual imaging for landscape design through our in-house landscape design department. It assists us with estimating so when we know the exact square footage of a property, we know how much of everything you’ll need. If you don’t know plant life, it’s hard to visualize. We’ve always done computer imaging, but we always try to stay fresh and at the forefront of the software that’s available. Now we’re able to let our clients see our vision for their property up close.
Q: What changes are ahead for your business?
A: We’ve really increased our vegetables and fruits. We’re going to line up 1,000 apple trees for a u-pick orchard. We’re doing 10 varieties of tomatoes: half the price of the grocery store, and you can pick it when you want it. This is a new endeavor for us in an effort to diversify what we offer. Staying fresh and moving forward is key. We refuse to get stale and in doing so, we’ve created a destination here.
Yes, we’re “that place along the highway.” I’m thankful to be by the highway. We have 57,000 cars a day that go by. People from all over find us.
Beyond the u-pick produce, we’re going to do hops for the microbreweries. In an effort to keep our employees on the books longer throughout the year, I created an Animated Holiday lighting service to keep them working through the late fall. And we’ve got something new in store for next year, but I think I’ll just let our competitors keep guessing as to what that might be.
Q: What trends do you see in this line of work?
A: Definitely vegetable gardening has become popular. Homes and apartments with raised beds are getting more popular, because it’s simple, anybody can do it and produce good crops in the comfort of their own property.
For what it’s worth, I’d recommend any new gardener to keep it simple. As a society, we’re always racing against the clock, so only take on what you can manage.
The outdoor living room concept has really been good for us. We’ve been doing a lot of fire pits and built-in grills; it’s basically like an extension of the house. People can go out and enjoy it, cook, get some herbs from their garden, pick their own produce and use them immediately.
Q: What’s difficult about your job?
A: This life is physically demanding, and it’s not for everyone. I’m very thankful, and I thank God for everything. I count my blessings for what we have. We’re dealing with more regulations. We worry about ticks, it’s hot, it rains … a lot, and it’s humid. But we’re outside, we get to work in nature and we get to meet a lot of great people. We get 10,000 people coming through here in the spring.
We’re all plant geeks here. We love seeing what’s new, especially all the different plant types, seeing how they’re going to work up here. I love traveling to other nurseries and going to trade shows out west. I’ve learned a lot from my peers. This industry has introduced me to a bunch of great friends and colleagues.
Nobody can predict the future, only the man upstairs. You just work at it. I’m thankful for what we have and where we are. We’re the only place like ours locally. We’re unique.
Q: Why is gardening important?
A: Gardening is an art — The art of expressing a thought with plants. Design is key. You have to be creative. There are a lot of advantages to thoughtful landscaping: storm water runoff, shading for energy, wind blocks for winter winds. Landscaping and gardening is really a necessity, not a luxury. We have a responsibility to protect the planet. It’s important that when you do building that you remember what was there before, so that you can put the proper amount of green space back in to protect the planet. That’s why I really like what I do. I know I am making a difference.
Follow Katie Sullivan on Twitter @ByKatieSullivan.
Kenny Williams
Business and title: The Street Smart Gardener, President W & W Nursery
Age: 45
Home: Apalachin
Hometown: Owego
Education: environmental design, Broome Community College
Hobbies: golf, musician and gardening
Family: wife, Sandy; son, Ryan; daughter, Aleah
Photo Credit: Andrew Thayer
Tuesday, August 18, 2015
Time to Divide Your Peonies!
Now is a good time to divide peonies.


If you have been moving things around in your garden and have some peonies, you might wonder if you find the little tubers left behind, can you plant them and expect them to grow. The answer is yes, but there is an appropriate way of propagating peony plants that you should follow if you expect to be successful.
How to Propagate Peonies
If you have been considering propagating peony plants, you should know there are some important steps to follow. The only way to multiply peony plants is to divide peonies. This might sound complicated, but it’s not.
First, you need to use a sharp spade and dig around the peony plant. Be very careful not to damage the roots. You want to be sure to dig up as much of the root as possible.
Once you have the roots out of the ground, rinse them vigorously with the hose so they are clean and you can actually see what you have. What you are looking for are the crown buds. These will actually be the part that comes through the ground after planting and forms a new peony plant when you divide peonies.
After rinsing, you should leave the roots in the shade so they soften up a bit. They will be easier to cut. When you are propagating peony plants, you should use a strong knife and cut the roots all the way back to only about six inches from the crown. Again, this is because the crown grows into the peony and dividing peony plants requires a crown on each piece you plant.
You will want to make sure each piece has at least one crown bud. Three visible crown buds is best. However, at least one will do. You will continue to divide peonies until you have as many peonies as you can get from the roots you originally dug up.
Plant the pieces in a location suitable for growing peonies. Make sure the buds on the pieces are not more than 2 inches under the soil or they may have trouble growing. If the temperatures are fairly even, you can actually store your pieces in peat moss until you are ready to plant them on a warmer day. Don’t store them too long or they may dry out and won’t grow.

Tuesday, July 7, 2015
14 Simple Gardening Tips and Tricks


1. To remove the salt deposits that form on clay pots, combine equal parts white vinegar, rubbing alcohol and water in a spray bottle. Apply the mixture to the pot and scrub with a plastic brush. Let the pot dry before you plant anything in it.
2. To prevent accumulating dirt under your fingernails while you work in the garden, draw your fingernails across a bar of soap and you'll effectively seal the undersides of your nails so dirt can't collect beneath them. Then, after you've finished in the garden, use a nailbrush to remove the soap and your nails will be sparkling clean.
3. To prevent the line on your string trimmer from jamming or breaking, treat with a spray vegetable oil before installing it in the trimmer.
4. Turn a long-handled tool into a measuring stick! Lay a long-handled garden tool on the ground, and next to it place a tape measure. Using a permanent marker, write inch and foot marks on the handle. When you need to space plants a certain distance apart (from just an inch to several feet) you'll already have a measuring device in your hand.
5. To have garden twine handy when you need it, just stick a ball of twine in a small clay pot, pull the end of the twine through the drainage hole, and set the pot upside down in the garden. Do that, and you'll never go looking for twine again.
6. Little clay pots make great cloches for protecting young plants from sudden, overnight frosts and freezes.
7. To turn a clay pot into a hose guide, just stab a roughly one-foot length of steel reinforcing bar into the ground at the corner of a bed and slip two clay pots over it: one facing down, the other facing up. The guides will prevent damage to your plants as you drag the hose along the bed.

8. To create perfectly natural markers, write the names of plants (using a permanent marker) on the flat faces of stones of various sizes and place them at or near the base of your plants.
9. Got aphids? You can control them with a strong blast of water from the hose or with insecticidal soap. But here's another suggestion, one that's a lot more fun; get some tape! Wrap a wide strip of tape around your hand, sticky side out, and pat the leaves of plants infested with aphids. Concentrate on the undersides of leaves, because that's where the little buggers like to hide.
10. The next time you boil or steam vegetables, don't pour the water down the drain, use it to water potted patio plants, and you'll be amazed at how the plants respond to the "vegetable soup."

11. Use leftover tea and coffee grounds to acidify the soil of acid-loving plants such as azaleas, rhododendrons, camellias, gardenias and even blueberries. A light sprinkling of about one-quarter of an inch applied once a month will keep the pH of the soil on the acidic side.
12. Use chamomile tea to control damping-off fungus, which often attacks young seedlings quite suddenly. Just add a spot of tea to the soil around the base of seedlings once a week or use it as a foliar spray.
13. If you need an instant table for tea service, look no farther than your collection of clay pots and saucers. Just flip a good-sized pot over, and top it off with a large saucer. And when you've had your share of tea, fill the saucer with water, and your "table" is now a birdbath.
14. The quickest way in the world to dry herbs: just lay a sheet of newspaper on the seat of your car, arrange the herbs in a single layer, then roll up the windows and close the doors. Your herbs will be quickly dried to perfection. What's more, your car will smell great.
Source: http://www.hgtv.com/design/outdoor-design/landscaping-and-hardscaping/14-simple-gardening-tips-and-tricks
Source: http://www.hgtv.com/design/outdoor-design/landscaping-and-hardscaping/14-simple-gardening-tips-and-tricks
Wednesday, July 1, 2015
Building a Compost Pile
First, pick a spot.
To start composting, pick the right spot for your compost pile. Look for a convenient section of your backyard that has good drainage and that complies with any applicable codes or regulations.
In some cities, for example, fire regulations prohibit locating a compost area within three feet of any structure. Consult your town or village official for any restrictions.
Select a method.
The easiest way to compost is the pile method. It costs nothing, requires little maintenance, and is useful for large quantities of yard waste (such as autumn leaves).
Just put your yard waste in a pile up to five feet high. In 12 to 18 months, the pile will have reduced in size to about one foot, and the bottom will have turned to compost.
If you prefer, you can use a bin. Compost bins can be purchased at many garden supply and hardware stores, or they can be constructed easily and inexpensively from a variety of materials.

In general, a bin can be any shape, but should be approximately three to four feet in diameter, and of similar height. Leaving the fourth side open or adding a gate permits easy access for adding and removing materials and turning the compost.
Although bins are good for ongoing composting, they’re usually not big enough for large amounts of leaves or grass clippings. To increase your composting capacity, you can put up to three bins, side by side.
The most inexpensive composting bins are made from recycled materials: wooden pallets or leftover snow fencing, for example. But if materials aren’t readily available, they can usually be purchased for less than $25. A pre-made bin can be purchased for as little as $25 to $50.
You’re ready to compost.
Depending on the method you’ve chosen, you can start composting by placing any compostable material (see list under Compost) in a pile, or placing it in your compost bin.
Be sure yard waste other than grass (such as brush or twigs) is less than 4” long and no more than 1/8” thick. Also, it’s best to mix grass clippings with leaves or other garden materials. This hastens the decomposition process.
Once you’ve started a compost pile, all it requires is moisture and oxygen. Turning the materials with a pitchfork once or twice a month increases aeration and moves materials from the outside of the pile to the center, where it can decompose faster and more completely.
As the weeks pass, you can continue adding waste material to your bin or pile. There’s no need to worry when winter comes, the composting process continues, but much more slowly. The, when temperatures rise in the spring, the process picks up speed again.

When your compost is ready, use it as a soil additive in your flower bed or as mulch around the trees or shrubs. If you like a finer compost, use an old metal screen to sift out any waste that hasn’t completely decomposed.
One word of caution: If you use weed killers or insecticides on your lawn, don’t use the resulting compost in your vegetable garden. It’s fine, however, for the rest of your yard.
Compost
Many types of yard waste can be composted, including:
• Leaves
• Grass clippings (as long as they’re mixed with other yard waste)
• Plant cuttings (unless they’re diseased)
Other organic materials can be composted too, such as:
• Sawdust and wood shavings
• Small amounts of fireplace ash If you desire, you can also compost certain types
of kitchen waste, although we recommend using a closed bin to prevent compost from attracting animals.
Add:
• Fruit and vegetable peels and leftovers
• Coffee grounds and filters
• Tea bags
• Empty egg shells
Do not add: eggs, dairy products, meat scraps, bones, grease, fish, kitty litter or barbecue briquets.
This information is provided from OCRRA Pamphlet “Earth Friendly Ways to Manage Yard Waste”
Tuesday, June 30, 2015
Growing Vegetables in Containers

If you use clean potting soil, container plantings will eliminate problems with:
- Soil borne diseases
- Infestations by harmful nematodes
- An invasion of weeds
Try these vegetables in a container:
Tomatoes
Peppers
Spinach
Chard
Herbs
Eggplant
Green Onions
Beans
Lettuce
Squash (Bush varieties)
Radishes
Carrots
Parsley
Cucumbers (Bush varieties)
Vine vegetables such as cucumbers and pole beans will also do well if they’re given some sort of support in the form of a pole, cage or trellis.
Choosing Containers
Use certain containers, wooden tubs, planter boxes, bushel baskets or anything deep enough to accommodate roots. Lettuce, peppers, radishes, herbs and the leafy vegetables need to be in a container that holds about eight inches of soil. Plant tomatoes in containers that are at least two feet wide and two feet deep.
Make sure you have drainage. Drill holes along the bottom edge of the container about a half-inch up from the bottom. If you’ve chosen a container that can’t be drilled, add two inches of coarse gravel in the bottom.
Watering
Container plantings might have to be watered more than garden plantings, particularly if the container is porous, such as a bushel basket or an un- glazed terra cotta container.
Attracting Hummingbirds

Hummingbirds are attracted to a bird garden habitat:
- Make fresh water available for drinking and bathing.
- Provide both sun and shade areas. Hummingbirds need shade to perch and to build their tiny nests.
- Hummingbirds may become reliant on your garden. When there are no blossoms, provide hummingbird feeders hung 30 feet apart throughout your garden. The best color for a feeder is red.
- Fill feeders with a sugar-water mix of one part sugar to four parts water.
- Keep feeders clean and filled.
- Never use honey that can develop a fungus fatal to hummingbirds.
- Hummingbirds are attracted to flower colors and nectar, not fragrances.
Favorite Flowers—Perennials
Bee balm .................. Monarda didyma
Butterfly weed......Ascelpias tuberosa
Columbine........................Aquilegia sp.
Coral bells ......... Heuchera sanguinea
Cosmos...............................Cosmos sp.
Dahlia.....................................Dahlia sp.
Delphinium...........Delphinium elatum
Foxglove ................................... Digitalis
Fuchsia.......................................Fuchsia
Geranium....................Pelargonium sp.
Hollyhock........ Althea rosea (biennial)
Lupine..........................Lupinus hybrids
Penstemon.................... Penstemon sp.
Red Hot Poker ........ Kniphofia uvaria
Sage ..............................Salvia officinalis
Speedwell...................Veronica hybrids
Favorite Flowers—Annuals
Mountain garland ...... Clarkia elegans
Touch-me-not ................ Impatiens sp.
Flowering tobacco .... Nicotiana alata
Nasturtium............Tropaeolum majus
Petunia..........................Petunia hybrids
Spider flower ....... Cleome hasslerana
Zinnia.....................................Zinnia sp.
Verbena .............................. Verbena sp.
Bulbs, Corms and Tubers
Tuberous begonia............. Begonia sp.
Canna.....................................Canna sp.
Gladiolus .......................... Gladiolus sp.
Iris.................................................Iris sp.
Montbretia..................... Crocosmia sp.
Vines
Bougainvillea..............Bougainvillea sp.
Cardinal climber..Ipomoea quamoclit
Honeysuckle......................Lonicera sp.
Lantana...............................Lantana sp.
Rosary Vine.............. Ceropegia woodii
Trumpet vines.....Campsis grandiflora
Shrubs and Trees
Abelia........................Abelia grandiflora
Azalea ...................... Rhododendron sp.
Bottlebrush....Callistemon lanceolatus
Butterfly bush ............Buddleia davidii
Cotoneaster............... Cotoneaster sp.
Eucalyptus......................Eucalyptus sp.
Flowering quince.....Chaenomeles sp.
Fuchsia.................Fuchsia arborescens
Hibiscus..............................Hiviscus sp.
Lilac ...................................... Syringa sp.
Weigela.......................... Weigela rosea
Tuesday, June 16, 2015
Front Yard Walkway Ideas

Walkways are an important part of front yard landscaping. A beautiful walkway will greatly enhance your home's curb appeal and provide a way for you and guests to get to your front door. You'll want the walkway to look nice and be easy to walk on since it will serve as an entrance to your home. Whether it will lead straight to your front door, or to a small courtyard garden or porch, there are many design options for front yard walkways.
Three important front walkway design considerations:
- Width
- Shape
- Paving Materials
Determining Front Walkway WidthWhether your walkway leads from the street to the front door, from the driveway to the front door, or from the front yard to the backyard, the walkway width is very important. When you are hosting parties or family gatherings it is likely that many people will be using the walkway. It should be wide enough that two people can comfortably walk side-by-side. Four feet is the minimum width for a front walkway, but five feet is preferred. Get more information about walkway dimensions.
Choosing the Shape of a Front Yard WalkwayThere are a few factors that should be considered when deciding on your front walkway shape. The first factor is the size of your yard. Typically, small front yards look best with a simple straight walkway, while a curved walkway can add much needed design interest to a large front garden. The second factor is the style of your home. If your home has a traditional colonial or Victorian style than a formal, straight path is the best option. A straight entry walkway will help to emphasize your front door as the focal point of your home. If your home has a ranch or Mediterranean style an informal, curved path is the best option. However, be careful not to overdo the curves because then people will take shortcuts through your front lawn.
Selecting Paving Materials for a Front WalkwaySince a front walkway is a big part of your home's curb appeal you should select materials that complement the exterior of your home. For example, if your house has brick accents a concrete walkway with a brick border would look especially nice. When selecting materials for your walkway, keep in mind that solid paving, such as concrete, stone or pavers, is easier and safer to walk on than stepping stones or gravel.
Subscribe to:
Posts (Atom)